Thursday, March 31, 2016

Quick Snowy Day Handkerchief Quilt

Ok. I admit I've not really been into pottery or crochet for a while. I've just been going through the motions for the last week or so because I know I have a show, my first show of the season, on Saturday. I know I needed to be ready for it, but all I've been able to accomplish is the bare minimum to be ready. I priced work, got one last kiln fired, packed up my boxes, and I have everything stacked, ready to go and with my remaining time I've been trying to make a few crocheted animals to take up to Artistree Gallery. 

I just don't feel like being a potter. So today I wasn't. Today I was a quilter. And I had a blast. I really did. I got almost an entire quilt top put together in about 5 hours. Plus with the snow coming down outside again, it was nice to be playing with fabric!

The handkerchiefs my mom found.
I've seen a couple examples of quick quilts made of handkerchiefs on Pinterest. You can find anything on Pinterest. And it just so happened that my mom found a bag of hankies left over from something my brother did in high school and she asked me if I could do anything with them. Well Yeah! I had actually just seen the examples on Pinterest when she asked me this and I decided today I was going to be a quilter.


I used a white board to work out what I was going to do. I had 6 blue hankies, 4 navy blue, and 5 five red. I was going to cut each one into 4 triangles to make half square triangles. And with my first layout design I needed 17 blue triangles, 16 navy, and 17 red. That would leave me with one whole blue hankie and a partial as well as a partial red hankie. I was hoping I could do a border with what I had left.

My second layout was rectangular and only needed 16 triangles of each color. And I figured that would be 8 half square triangles (HST) of each color combination. This is the layout I planned on using.

I don't like sewing triangles together so I use some shortcuts when I'm making multiples of triangle pieced squares.

And I'll admit right away, I messed up when I started sewing. You see normally when I'm making HST they are small and I make two from each square. You sew diagonally across the square on either side of a draw line and then cut on the line. This time though I needed 4 HST out of each square or hankie. I sewed through the middle of my hankies when I should have sewn around the outside edge and cut on the diagonals to get 4 HST using 1/4 of each hankie. So I'm going to describe what I did instead.


With hankies "right side" "wrong side" doesn't really matter. Both sides are the same color. The only ways to know if you have the right side or not is to check the printed words, if they are backwards you are looking at the wrong side and the hem around the edge shows a bump on the wrong side.

Pair up the hankies based on what color combinations you need in the design. Draw lines diagonally corner to corner both ways.


I sew a presser foot width on either side of the drawn lines. Line up the edge of the presser foot with the drawn line and sew down one side then turn it around and sew down the other side.


Do this on both lines to make a cross of stitches. I chain sewed my hankies, lining up the next seam when I came to the end of the last. You'll waste less thread this way.

This is where I realized I had done something wrong to make it to my original design.

Next cut on the drawn lines both directions to make 4 triangles. At this point they are not good for much except maybe a hat or an impromptu bag for berry picking.

I just made them into smaller HST.

Then cut vertically from the point to halfway across the bottom.


Do this to all the paired hankies.


Next press all the seams to the dark sides.


I don't know if I've mentioned in other posts that I am a lazy quilter. Unless a square is totally and completely the wrong size, I don't "square up" my squares. I just go with it. I did cut off the little corner bits that stuck out though. This gets rid of some of the extra bulk that occurs anywhere multiple seams meet.


I laid out all the pieces to make sure I liked the way it looked. They could have been rearranged to make diamonds or zigzags, but I like this look, and it didn't require much thinking.


Next sew the individual squares into rows.


And sew the rows into a single top. I still have 2 full blue hankies and a full red one, I'm thinking I may put a border on it yet, but to get to this point only took me about 5 hours. Would have been less if I had realized where I went wrong before I had sewed all the hankies together. I wasn't about to pull out all those stitches, but I improvised a little and ended up with a fun, bright quilt top. Now I just need to put on a border and get batting and a backing fabric. I may have something I can use in my stash right now.

I used the hankies I had on hand, but there are handkerchiefs available in craft stores that are every color of the rainbow and those would make some really fun, bright quilts! And super quick to put together!

Thursday, March 24, 2016

The Nightmare of Pricing

As an artist I am forced time and time again to determine the "value" of my work. Any artist if they plan on selling work must place "value" on their work. How can I decide how much my time is worth? Figuring the cost of materials is no problem. I just have to estimate how much material I used and then divide that amount from the whole price of what I bought the assorted materials for.

No big deal.

Baby bowls with recycled wine bottles melted into the bottoms.

But to decide that my time is worth X amount, and then figure the specific amount of time I spent on that one item, when I don't make one piece at a time, and multiply X by time and add in materials cost... I'm still not sure that really covers the "value" of any piece of my work.

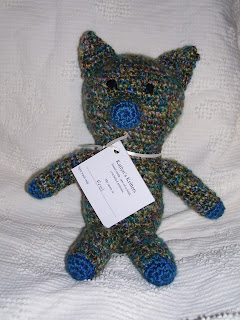
One of my crocheted pigs.

At art fairs I get asked how long I've been doing pottery and often I get asked how long it took me to make a mug for example. Well, I've been making pottery for sixteen years and while it may have only taken me five minutes to actually throw that mug, I haven't only spent five minutes making that mug. I've spent sixteen years and five minutes. Sixteen years of practice and scrapping work and starting over is really very hard to place an accurate "value" on.

Mugs, the one item every potter gets asked for.

I also have to add in drying time, adding a handle, firing, glazing, and firing again. But like I said before, I don't make just one mug at a time. I will wedge up about 20 one pound balls of clay, throw 20 mugs, wait for them to dry, trim and attach handles to 20 mugs, wait for them to dry completely checking often to make sure the handles are staying attached, fire those 20 along with other pieces in a kiln for 8-10 hours, glaze all those pieces, fire them again for 8-10 hours and then I have to determine "value" for just that one mug and all the other individual pieces.

A serving bowl or large salad bowl.

And that's just for my pottery. How do I figure the same "value" of my other things I make? My quilts and crocheted items require different amounts of time and attention than my pottery does, but I still have to figure out a price.

A baby quilt or lap quilt I made from an assortment of fat quarters.

I seem to undervalue my work. While I have no problem spending $30-40 on another potter's mugs, I'm still afraid to ask for that much on one of my mugs. I think they are worth more than what I ask for them, but I'm afraid other people won't see that much "value" in my work. Which is why it has taken me six years to finally price my work closer to what I think it is really worth. I'm still not sure if I will have given my work enough "value" even after I reprice everything, but hopefully I'm getting closer and hopefully others will see the true value of my work and not just a price sticker.


Friday, March 18, 2016

Trying to be Productive!

It's been a slow week for creativeness. I have been doing things, but mostly I'm waiting for pots to dry so I can load the kiln for a bisque firing.

Pitchers for a maple syrup fest in  Phelps on April 2nd.
I ordered some new chemicals for glaze making. I have an idea that I'm working on. Well actually a couple of new ideas. One is a reworked idea from something I did a long time ago, shortly after I first learned how to do pottery. I'll let you all know how that turns out once I get some things finished there. And the other is some beads.
Some star studded items and my box of bisqued beads in the background.

I'm trying to find something easy for me to make that kids would be able to buy for themselves. I always loved buying beads individually at the bead stores, and if I provide small pieces of cording the kids would be able to turn the beads into bracelets right there. I'm mostly hoping to have some of these for the Renaissance Faire in September that I will be a vendor at. There are going to be two days of school field trips this year and last year I didn't really have anything for the kids to afford.

Just waiting for everything to dry!
Something else I've been working on is getting my crocheted Kritters restocked. I make brightly colored crocheted animals that I call Katlyn's Kritters and over the last few months I haven't really been interested in crocheting so my stock of those has been dwindling. This week I've finished three, I have one ready to be assembled, and one is still missing a few pieces. I also have a request for one for a baby shower.

Special order bear.
And a special order duck.
Got a pig done!
I was working on these one time up at Artistree Gallery where I am a member, and one of the other artists came by and told me it look like a stuffed animal massacre. I had pieces of animals and stuffing laying all over the table I was working on. I told them I felt like Dr. Frankenstein, sewing them all back together!

The pieces of a bunny, I started stuffing this one, just have to assemble it now.
Something else I've tried several times this week is to turn my first skein of hand spun yarn into a hat. You know, because now that winter is almost over I'm going to need a new wool hat. Although sarcasm aside, this is northern Wisconsin and we did just have a snow storm dump another 4 or so inches on us and we could get several more inches yet before May, so a new hat isn't really an odd idea. My problem now is that having tried three times to make this hat, and having pulled it apart three times, I'm not sure this yarn is going to work for anything I have to follow a pattern for. It definitely does not meet the specified stitches per inch gauge.

A large cat I started before Thanksgiving and lost interest in, but I'm going to finish him!

So I have been around and trying to be productive, I've just had a lot of things in progress and nothing finished to share. I always feel a little discouraged when this happens. I like when I finish things and going a week or more without any successfully finished items makes me feel like I've been slacking even though I know I've been working.

Saturday, March 12, 2016

Be a Daily Creative

I started out this year with a goal. I was going to do something creative every day, but I was more specific than that. I was going to paint something or write something every day and not just in my journal. I wanted to write poems or short stories and then paint a picture to go with them. I figured if I didn't finish a painting, at least I could write a little something and then paint the next day or finish the painting the next day.
I also decided this year to be fearless. I have this above my bedroom door to remind myself.

I actually kept up with it for a couple weeks. And then I started going every other day, then every third day, then once a week. I've heard it takes 21 days to make or break a habit. I didn't quite make it to 21 days with the daily creative venture.

I only wrote one poem, and I consider myself even less of a poet than I consider myself a writer.
This is the painting to go with my one and only poem.


Soft colors washed across the sky;
In the quiet time 'tween day and night.
Stark trees stand watch over it all;
And shadowed snow, blue in the light.

Sounds fade as creatures settle down;
Color fades, snow blends into sky.
Nothing left now but a gentle breeze;
Blowing through the trees with a sigh.


A self-portrait. I had never done one in watercolors before.
I've not painted anything now since the end of January. The box of my supplies is still sitting on the floor, where I can pretty much trip over it if I'm not paying attention and it makes me feel guilty. Not guilty enough to set aside the things I have been working on, but guilty enough to remember that I bought a couple packs of watercolor paper specifically for the purpose of painting every day.

My miniatures.
I painted a few full sheet images, I was also painting miniatures. I divided an 11 by 15 inch sheet of watercolor paper into 20 equal sized spaces and each day I could sit down and paint for 20 to 30 minutes and have a cute little painting done for that day. I did 15 of those. This idea was inspired by a class being offered at Penland School of Crafts in North Carolina. I read the description for that class and decided to just try it. I didn't have to paint miniatures all day every day, just once a day and I could say I had painted that day.

I started out with a sewing theme: thread, button, scissors, flexible ruler.
My miniatures in order of painting are thread, button, scissors, feather, flexible ruler, dice, unlit votive candle, lit votive candle, half melted votive candle (I was trying to see if there was much difference in how I painted each stage), mug, a rock (my least successful object), marble, clothes pin, Rubik's cube, and a banana.

My mom has asked me to do a series like this of her summer flowers this year. I think that will be fun. Although with the warming weather I should at least divide a piece of paper so that as the spring flowers start to bloom I can begin painting.

Clothespin
I really would like to start this again. Or try to make it a part of my normal daily routine. The thing I discovered in the short time I did a painting each day was that I need to have it be a part of my morning routine when I write in my journal. You know, like, breakfast, email, journal, painting, and then the rest of my day. The problem with this schedule though is that if I want to paint the sunrise as it is happening I have to paint first then everything else. Or if I want to paint flowers out in the yard I can't do that while the sun is still down. I didn't know how to work it into my schedule.
Scissors, I really like the way this one turned out.

Is this something you would add to your own life? Just a little moment of being creative out of the whole day, but a little moment of feeling you've accomplished something.

For an idea of how small the miniatures are.

Tuesday, March 8, 2016

Spinning a New Passion

I have no idea when I decided to learn spinning. I know it was sometime between the ages of 13 and 16. Probably closer to 13. My dad and I go to the Midwest Renewable Energy Association's (MREA's) Renewable Energy and Sustainable Living Fair almost every summer. I started going the year I turned 13, I had won a t-shirt design contest for a special kids' shirt that year, and I've been going ever since.

At the fair there are booths set up promoting products to live a sustainable life. Several of the booths were selling products and one booth always fascinated me. It was Mielke's Farm, now Mielke's Fiber Arts. Their booth was full of wool, fleeces, roving, rugs, finished products like socks, hats and mittens, spinning wheels and drop spindles.
My first spun yarn. Chunky and uneven and I still don't know what to make out of it!

This one year I had the itch to learn how to spin so I bought myself a drop spindle beginner's kit. It had a drop spindle, a small bundle of light blue wool roving, and printed sheets of how-to instructions. That year I also bought a bag of bright turquoise roving because I thought for sure I'd be able to finish spinning the roving that had come with the beginner's kit and that I would want some more.

Plus I needed the practice. Even after using all the roving from the beginner's kit and part of the roving from my extra bag, I was still making chunky uneven yarn.
My first two batches of yarn.

The next year I was bored of my solid roving colors and decided I should get one of the variegated bags of roving. It was called "blue," but only had a base of blue. There was also yellow, red, green, pink, white and other colors mixed with it. Using up this roving was far more fun than the solid colors. Every now and then the colors besides blue would make a solid appearance and I ended up with a bright spot of color.

I bought the blue roving at least 12 years ago, I just finished turning it into yarn last week. I've now started on the process of turning the remaining turquoise roving into yarn. Here's a photo process of how I spin:

The "blue" roving before being spun, this is only a small amount left from what I started with.
A section is pulled from the main ball of roving leaving wispy ends.
The wispy ends on the roving are spread out a bit in length to be more easily spun onto the wool already on the spindle without creating a lump in the yarn, whether that is the beginning yarn left on the spindle or the end of the yarn you are making.
The bit left to overlap with the new roving.
While spinning "singles," the yarn before it is made into 2-ply, the spindle is spun in a clockwise direction. The yarn is worked up the center shaft in a spiral and wrapped a few times around the hook at the top of the shaft, keeping the yarn on the spindle with friction.
The white at the base is the starter yarn, every yarn begins by being spun to this starter.
I hold the roving in my left hand keeping a firm but gentle grip to keep the fibers from slipping loose and allowing the spindle to fall. My right hand controls the constant spinning of the spindle and the flow of fibers from the roving.
You can spin with a spindle sitting down, but then you will have to wind the spun singles more often.

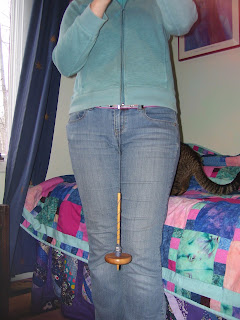
I prefer to stand.
I can spin the section of roving I pulled from the main ball in about 7 minutes, unless I lose my rhythm and drop the spindle.
My cats are always interested in helping. I think they are attracted to
the smell of the wool and of course the spinning thing of yarn!

Once I have a full spindle, or I run out of roving like I did here, I turn the "singles" into 2-ply yarn.

Only partially full, but I ran out of roving before I had a full spindle.
To turn singles into 2-ply I recently learned how to Andean Ply by watching a video from Mielke's Fiber Arts. Mielke's Farm Andean Plying Before this I unwound my whole spindle back and forth through the house creating a spider web to match up the two ends of my singles.
Wrap the end of your single around your pointer finger to anchor it.
Your palm is the front of your hand.
Bring the yarn to the back of your hand, around to the front and
loop it around your middle finger going back the way you came from.

Then down behind your thumb, back to the front.

And around your middle finger again, heading back the way you came.

The loops will alternate over each other on your middle finger.

Continue to do this until you run out of singles, or your hand can't hold any more.
Don't do this wrapping too tight, you don't want to cut off any circulation to your fingers and you will need to be able to take the loops off your middle finger.
You will slip the overlapping layers off your middle finger carefully

Here is the overlapping section taken off my finger. Slide the singles down to your wrist.

Turn the overlapping section to the back of your wrist.

The ends will automatically want to spin together.
I knot together the two ends of my singles Hook the knotted end to the end of your spindle, you will now be spinning opposite of how you made the singles. Spin your spindle counterclockwise. If you watch the video, Mielke's Farm does a very good job of explaining how to do Andean Plying.
I tied a knot in the end to start the plying process.
The two parts of the singles will come from the back of your hand, around either side of it, to meet up at your thumb and fingers. This is how you will keep the proper amount of singles coming to prevent any knotting or uneven plying. Once I have the plying started, I move the knotted end to the point on the bottom of my spindle and wrap the yarn around the shaft working in counterclockwise fashion. Continue plying until you reach the end of the singles.
The final end will have a loop in it.
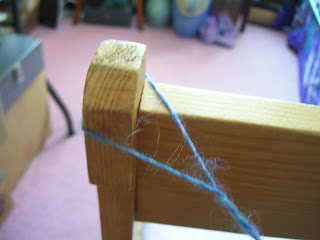
I do not have a niddy noddy, a spinning tool for making skeins of yarn. I use the back of my chair.
Loop goes over the top of my chair back.

Taking the yarn from the spindle to the back of my chair.

I slip the yarn from here.

Twist the ends a bit.

And stick one end through the loop of the other to make a bundle.
I don't know when it happened, but at some point during my spinning I finally got the rhythm figured out and have a much more even spinning ability. No more lumps, I still sometimes get a thin spot that comes apart though.
My four little "skeins" of yarn.
The problem I have now is that I don't like to knit. I have my spun yarn, but don't know what to turn it into. I'd like to make something for myself so that I can say that I made this from roving to singles to yarn to... Whatever I end up making. Maybe a hat, mittens. Maybe a shawl. I'm not sure yet. One thing I do know however, I'm going to need more wool!