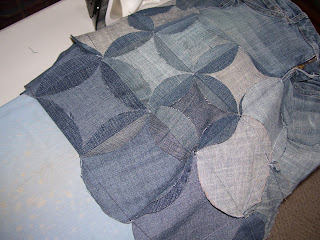
To begin this time, you will trace your squares and trapezoids onto your circles. I used pen, these are going to be your sewing lines so you want to be able to see them clearly. Make sure to line up the corners of your squares and trapezoid with the edges of the circle it belongs to. If you pair the wrong size shape with the wrong circle, your shapes will not fit, you will end up missing pieces, and your sewing lines won't line up.
I started at the top of the skirt, so take the circles with your traced 4 inch squares, pair them up and place them right sides together, the sides without the drawn squares. The squares should be facing out and visible. Line up the squares so you have the edges of your circles matching and one set of sewing lines. Stitch the circles together on one side following the line. I chain pieced mine, which is why they are all joined together in the picture.
Continue sewing the circles together to make one long line of circles. Then sew the first circle to the last to make a loop.
When you have a loop you will pin the joined circles to the cut edge of the jeans leaving about a quarter to a half inch of the cut edge below where you will be sewing. Remember to keep the drawn lines on the outside of the skirt and keep the leftover edges of the circles loose, those will get pressed flat later. I lined up a seam in the circle loop with the center seam on the jeans. Using that as my guide, the back also lined up with a seam in the loop placed with a seam in the pants.
Sew around the drawn line attaching the loop to the skirt top. I've always been told to remove pins before you sew over them. Hitting a pin with the machine needle can cause the machine needle to break, possibly sending pieces flying. I never sew over my straight pins.
 |
| Sewing on the drawn line to join skirt to top. |
 |
| Skirt with the first row of blocks in place |
You will do this same process of creating a loop with the other sets of circles. When working with the trapezoid circles, be sure to put the short edge of the trapezoid always on the top. Stitch together the sloped edges of the trapezoid, this will create the flair in the skirt and you should see a curve forming in this loop while assembling the trapezoid circles.
You will line up the bottom of the 4 inch squares with the short sides, the tops, of the trapezoid circles. Match up the seams again to center the blocks front and back. Line up the edges of the circles to sew row to row.
Sew the 5 inch square circles the same way as the 4 inch.
When joining the 5 inch long sides of the trapezoid circles to the 5 inch square circles, you will not line up the edges of the circles. This would leave holes in the skirt. Instead you will match the lines up and pin them in place.
 |
| Pinned the last row to the trapezoid row. |
There will be a bit of extra fabric from the trapezoid square sticking out from behind the 5 inch square circle. You need this extra bit to create the correct pattern of the Faux Cathedral on a trapezoid.
 |
| Be sure to line up the trapezoid circles with the 5 inch circles so the seam looks like this! |
After sewing on all the rows of your skirt, turn it back so you can see the raw edge of the cut off top. If you have a serger, by all means use that, I don't so I zigzag stitched around the edge to keep it from fraying.
After serging or zigzagging the edge turn the skirt right side out and iron the circle edges into the center of the square it belongs to. You will be able to see the right side of the jean material in contrast against the wrong side.
 |
| Pressing the circle edges into the squares. |
Now you should have a skirt with no pins and hopefully no holes. All of the edges from the circles should be loose, but pressed to form the Faux Cathedral squares.
 |
| This has not been ironed yet, but you can see the shape of the skirt here. |
Next time you will need to have picked out your fabric or fabrics and I hope you kept your template for the trapezoid at the very least. Cutting out squares should be fairly easy with a rotary cutter and a quilting ruler, but I found the template for the trapezoid helpful!


HURRY! I want to see the finished product!!! This will be the perfect skirt to wear for your shows this summer!!!
ReplyDeleteThat was my plan! Plus I'd be able to wear whatever color shirt with it that I'd want.
Delete