Sunday, February 28, 2016

Faux Cathedral Skirt Part 2

Last time you made all your templates and cut out your circles. Now you will start to assemble the skirt.

To begin this time, you will trace your squares and trapezoids onto your circles. I used pen, these are going to be your sewing lines so you want to be able to see them clearly. Make sure to line up the corners of your squares and trapezoid with the edges of the circle it belongs to. If you pair the wrong size shape with the wrong circle, your shapes will not fit, you will end up missing pieces, and your sewing lines won't line up.


I started at the top of the skirt, so take the circles with your traced 4 inch squares, pair them up and place them right sides together, the sides without the drawn squares. The squares should be facing out and visible. Line up the squares so you have the edges of your circles matching and one set of sewing lines. Stitch the circles together on one side following the line. I chain pieced mine, which is why they are all joined together in the picture.
Continue sewing the circles together to make one long line of circles. Then sew the first circle to the last to make a loop.


When you have a loop you will pin the joined circles to the cut edge of the jeans leaving about a quarter to a half inch of the cut edge below where you will be sewing. Remember to keep the drawn lines on the outside of the skirt and keep the leftover edges of the circles loose, those will get pressed flat later. I lined up a seam in the circle loop with the center seam on the jeans. Using that as my guide, the back also lined up with a seam in the loop placed with a seam in the pants. 


Sew around the drawn line attaching the loop to the skirt top. I've always been told to remove pins before you sew over them. Hitting a pin with the machine needle can cause the machine needle to break, possibly sending pieces flying. I never sew over my straight pins.
Sewing on the drawn line to join skirt to top.
Skirt with the first row of blocks in place

You will do this same process of creating a loop with the other sets of circles. When working with the trapezoid circles, be sure to put the short edge of the trapezoid always on the top. Stitch together the sloped edges of the trapezoid, this will create the flair in the skirt and you should see a curve forming in this loop while assembling the trapezoid circles.

You will line up the bottom of the 4 inch squares with the short sides, the tops, of the trapezoid circles. Match up the seams again to center the blocks front and back. Line up the edges of the circles to sew row to row.

Sew the 5 inch square circles the same way as the 4 inch.


When joining the 5 inch long sides of the trapezoid circles to the 5 inch square circles, you will not line up the edges of the circles. This would leave holes in the skirt. Instead you will match the lines up and pin them in place.
Pinned the last row to the trapezoid row.

There will be a bit of extra fabric from the trapezoid square sticking out from behind the 5 inch square circle. You need this extra bit to create the correct pattern of the Faux Cathedral on a trapezoid.
Be sure to line up the trapezoid circles with the 5 inch circles so the seam looks like this!


After sewing on all the rows of your skirt, turn it back so you can see the raw edge of the cut off top. If you have a serger, by all means use that, I don't so I zigzag stitched around the edge to keep it from fraying.


After serging or zigzagging the edge turn the skirt right side out and iron the circle edges into the center of the square it belongs to. You will be able to see the right side of the jean material in contrast against the wrong side.
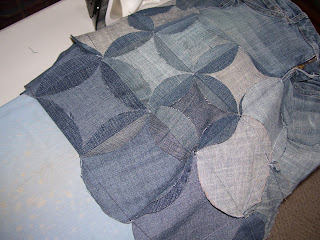
Pressing the circle edges into the squares.

Now you should have a skirt with no pins and hopefully no holes. All of the edges from the circles should be loose, but pressed to form the Faux Cathedral squares.

This has not been ironed yet, but you can see the shape of the skirt here.

Next time you will need to have picked out your fabric or fabrics and I hope you kept your template for the trapezoid at the very least. Cutting out squares should be fairly easy with a rotary cutter and a quilting ruler, but I found the template for the trapezoid helpful!

Friday, February 26, 2016

Faux Cathedral Block/Recycled Jeans Skirt Part 1

Not the completed skirt, it's still full of pins!
So I saw a faux cathedral quilt made out of recycled jeans on Pinterest and I really liked it. But I've been wanting to make myself a patchwork skirt and I have plenty of worn out jeans, so I combined the two. My jeans always wear out by the seams on the inside thigh areas. Nowhere else, just there, and that leaves a lot of good solid material left behind. I've been patching the holes and wearing patched jeans because I just can't justify throwing out all of that material.

I'm going to show you how I made a skirt from jeans and an adapted quilt pattern!

You're going to need at least two pairs of worn out jeans that you don't mind cutting to pieces, or the equivalent in large scraps. One pair of jeans needs to fit you or the person you are making the skirt for so you can use the waistband, pockets, button and zipper section. You will also need the following:
1. Poster board or cereal boxes for templates;
2. A drawing compass (not a map or directional compass, we don't need to find North) or a push pin and some yarn or string to draw circles with;
3. Pencil, pen, permanent marker, fabric marking pencils;
4. Assorted rulers or tape measures, I used my quilting rulers and my flexible tape measure, plus a triangle for making my squares square;
5. Scissors or a knife for cutting out the templates. Be careful with sharp objects!
6. Sewing and quilting tools, rotary cutter, fabric scissors, straight pins, sewing machine, thread;
7. And of course assorted fabrics to add color and fun to your skirt!


So the first thing I did was lay flat my jeans that still fit me and I measured from the waistband to the bottom of the back pocket to make sure I didn't cut any off. On mine that was 9 inches.


Next I flipped over the jeans and cut straight across just above the groin of the jeans, making sure I was at least 10 inches down from the back waistband to leave enough space for a seam allowance without clipping the back pockets.
Be sure to save your cutoff pants legs, you'll need them.


Then I measured the cut edge to determine how many squares I would need to go around. My edge was 20 inches, then doubled because it is folded in half for 40 inches.


This means that I would need eight 5 inch squares, or ten 4 inch squares, or twenty 2 inch squares. I also did some math to figure out how big of a circle I would need if I used a 5 inch square. You can also just measure the diagonal on the square. I needed about a 7 inch diameter circle for a 5 inch square.


Here are my templates for the squares. I made one of each just to see the size comparison. I decided to start with 4 inch squares because I liked the way that size square looked with my jeans top. You will need the squares for further steps, hang on to them. I ended up using both the 4 inch square and the 5 inch square for my skirt, but I may use the 2 inch one in another project so I kept that one as well. You only need to make the ones you need for this project. 


I decided I wanted my skirt to flair a little instead of being a pencil skirt so my top row was the 4 inch squares, my second row I made a trapezoid, and the third row, or bottom row in my skirt I made from 5 inch squares. To make the trapezoid I drew a 4 inch line and marked the center (2 inches). From the center mark I measured down 4 inches making sure I was perpendicular to the top line. This is where the triangle came in handy. From that mark, using it as the center, I drew a 5 inch line parallel to the first, 2.5 inches to either side of the center mark. Then I connected the top left corner to the bottom left and top right to bottom right. Cut it out and you have a trapezoid template.

For a pencil skirt use all the same size squares. No trapezoids.


If I had been able to find a drawing compass I would have used that to create my circles, but I couldn't so I used a push pin and some cotton yarn. First draw in the diagonals on your square to find the center. Then tie a loop in the end of your yarn and stretch it to the corner of the square, push the pin through the yarn, template and another piece of cardboard pinning it down where your lines crossed. I continued to hold the pin while I drew my circle to keep everything in place. Keep your pen or pencil as upright as possible to keep the circle as even as possible.

A compass would have made this part a lot easier. My yarn slipped and stretched a little, but I still got an acceptable circle. If you are making a skirt with a flair, repeat this step using your 5 inch square template. Also, to keep track of which square and circle go together, I would mark which circle was made with which square, I did not at first and I got them confused a couple times.

Cut out your circles.

The 4 inch square and circle.
The 5 inch square and circle.


To make the circle for your trapezoid, I don't have any tips for measuring or using a compass because the center will be a little off center. However, I discovered that I needed a circle a bit bigger than the one I used for the 4 inch square, and that a Cool Whip container lid was just a little bit bigger. So I used a permanent marker to trace the lid to make a thicker line which I then cut around just to the outside of to make it even slightly larger and it ended up just about perfect. (When I cut out the fabric for these I also cut just to the outside of the traced line and then it was the right size circle, but more on that later.)
You can see I left the permanent marker line on the circle for the trapezoid.

After you have all of your cardboard templates, you will begin to trace your circles. I cut along the inside seam of the pants leg to open them flat. I managed to get all ten of my small circles (for the 4 inch squares) out of one leg. Trace each circle onto the wrong side of the fabric, what used to be the inside of the pants leg, with a fabric marking pencil to wash out, or a blue or black pen. The pen will not wash out but makes an easy to see line. Don't use the permanent marker here, it will bleed through and you will see it on your finished product.

You will do this for all of your circles. I needed ten of each size. The slightly larger circles I got nine from each pants leg, which is where your extra pair of jeans will come into play. I tried to match the colors of jean material, they are not exact, but they are close. If you do not have enough of one color jeans, mix up the pieces you cut from each color. What I mean to say is cut some of each size from each color and then scatter the colors in each row. Again somehow mark each size of circle to keep track of them.
Cut out all your circles. And keep them organized by size! You may iron them if you wish. I did not, I tend to be a lazy quilter and try to skip steps. Sometimes it works, sometimes I realize I should have taken a little extra time, in this case I was just fine having not iron my circles flat.


Here is where I'll leave you for today! Get your templates cut out, cut out your circles and think about what color or colors you want your finished skirt to be. I changed my mind several times on fabric colors before I finally settled on what I wanted to do. Next time I'll start to lead you through assembly. So make sure you come on back!


Monday, February 22, 2016

Glazing Method

My glazing process is a fairly organized affair. If I don't follow a certain order for my glazes I end up mixing them multiple times and I'd rather only stick my hands in the glazes once each. So here's what I do:

First I divide my bisque pieces into groups by the color combination they will receive. I do this based on what I am glazing and what recently sold.


Each group is placed by a label telling me what glazes they will be finished in. I have these in a certain order on my counter also. So I can be sure that each glaze is used as many times as I need it. A couple times I ordered these labels with one out of place and later realized I had completely skipped one combination and had to remix some glazes to finish those pots.


Next I wax all the bottoms of the pots. This keeps excess glaze from sticking to the foot of the pot and allows for easier cleaning. If there is any glaze left on the foot of the pot it will stick to the kiln shelf and cause all sorts of problems for me.


Then each piece gets the interior color poured in, the top rim dipped and the patterns applied. The pots are left to dry briefly while I complete all the other glazing necessary to finish before I can move onto the next color.


The outside color is applied by dipping. I go over each pot before I put it in the kiln to make sure no air bubbles caused gaps in the glaze and that the surface is smooth. If it has any problems I apply a little extra glaze or smooth it by gently rubbing my finger over the surface of the pots. This helps to prevent pinholes from forming.


Pots are loaded into the kiln one at a time. I always feel like I am playing a very careful game of Tetris. Except I don't want any of these pieces to touch each other. I try to fit as many pieces into a single kiln as possible so I try to have small pieces to fill in the gaps left by the larger pieces. The little pitchers, bowl, and the mini cup in the first layer were fillers for the four larger bowls.

There also has to be four shelf support posts on each level where another shelf will be placed above.

The top shelf in my kiln also gets a guide cone. I watch this specially formulated piece of porcelain during firing to make sure the kiln doesn't overfire. If the kiln reaches the correct temperature this cone will have a slight curve in it, if the kiln overfires the cone could end up as a puddle on the shelf and most likely the glazes will have started to melt right off the pots. Or worse.


 I never want a complete meltdown. That can more easily happen to a low fire clay like terra cotta or earthenware. I saw the results of an overfire like this in college. The inside of the kiln was coated in what looked like cooled lava. Black, bubbly piles of what used to be pottery and sculptures. The kiln had to have the bottom two layers of brick rebuilt, the affected shelves and support posts thrown out, and the person responsible was never allowed to fire the kiln again.

I was not the one responsible, and none of my work was in that kiln. Thank goodness. It was definitely a teaching moment. I hope to never have a problem this severe in my studio, which is why I always check on my kilns during firing. I'm a little bit paranoid when either of my kilns are running. But I'd rather be paranoid than have a meltdown or have to call the fire department!

Saturday, February 20, 2016

Welcome to my studio!

My studio is really my dad's garage and wood workshop. I sort of took over after college graduation. Although it isn't technically completely my fault.

My dad made it really easy for me. First he moved aside his tools, then he put in the furnace, he built me some shelves, wired a spot to plug in my kiln, added more shelves, moved more tools so I could stack boxes of clay, built me a table to store more clay under, gave me some cabinet space to store my glaze chemicals. Now he's trying to figure out how to add on to the back of the garage to move my kilns out there so I can work even while my kiln is going...

Really, it's like he doesn't want me to leave.

I appreciate it. If he hadn't done all of that and more, I'd have to find space to rent for a studio since a potter really needs access, somehow, to a kiln, wheel, and space to work in.

I guess you could say that my studio is my dad's workshop first, because even after I leave he'll still be working there, then my studio, then it is also storage for anything that doesn't have a home elsewhere. Tools, wood, supplies, random bits of weirdness placed in odd spots. One of my grandpa's gold fillings is sitting on top of a piece of turned wood, that hasn't quite turned into something yet, on the workbench. Yeah, random bit of weirdness.

These are my kilns. Since they have the same plug I can use the same outlet for them. I can fill both and if I have to, I can fire one one day then the next fire the other simply by switching plugs while I wait for the first to cool. Or the one day, I was getting really close to a deadline and wanted all of the pots that were almost done, I fired two in one day. I slept in our just finished gypsy wagon so I could get up every couple hours to turn up and keep an eye on the one that was firing overnight. It comes in handy to be able to switch them when I have a lot to get done in a short amount of time.

My wheel is a Brent. I have used Brent wheels since the very beginning. The kick wheel I threw my first pot on might have even been a Brent, I'm not sure since that was, gosh, sixteen years ago. I had a Brent wheel in my first pottery classes and in high school, and in college, and at the class I took the year I graduated from college. It was a natural choice for me and now any time I use a different brand it feels funny. Like I'm cheating on all the Brents I have ever used.

The bucket was a gift from a friend and mentor when I was only a few years into my pottery journey. Amy, currently of Pigeon Road Pottery, was trying to prank me in return for my scaring her one night around Halloween. This bucket, along with some other smiley face goodies were sitting by the tire she told me had gone flat on my car. It has been my slop bucket ever since. And always brings a smile into my studio, even when I don't. Of course it has no choice, it's a bucket.

Sometimes it gets crowded in the studio. Especially when my dad has something he needs to work on and his tools are buried behind stacks of my clay and glazes and we have to rearrange everything to get out what he needs. Or when I have a show and I have to move stuff around to get the things I require for my show which are also buried until I need them. We make it work, not always gracefully, but it'll do for now. Well, it'll have to do until I find a studio of my own to clutter up.

Tuesday, February 16, 2016

Necessary Evil or The Kiln

All of my kilns, I have 4, came from studios where people were upgrading to a bigger kiln or getting out of pottery. I ended up with two different models of the same kiln. They are a Knight 82 and a Knight 82T. These are the only two I have set up for use at this point in time. If you are in the pottery world there is a very good chance you have never heard of Knight kilns. I know I hadn't when I first got them.

I am very fortunate to have been given these kilns. I could start out slow and small. First buy a wheel then, eventually I can upgrade to a bigger kiln when I have my own space. The problem with getting used kilns is that there is more required maintenance. I've learned over the years how to take apart and clean connections, change elements and do some of the basic maintenance on my two little kilns.

Oh yeah, did I mention these kilns are little? Only about 18 inches inside diameter and maybe 24 inches tall. I can easily fill these kilns, but I also get a much smaller return for each firing.

I use one kiln for my bisque firing, it goes quick enough for that but whenever I try to do a glaze firing it takes several hours more than the one I normally use for glaze firing. But I have noticed over the last few firings I have done in my glaze kiln, that it has steadily taken longer and longer to reach temperature. Which means the elements are probably getting old.

So, I ordered elements last year and I am just now getting to replacing them because it is a big ordeal to completely take apart the kiln and put it all back together the way it belongs. I got one element replaced yesterday, I hadn't done one in a while it took me almost 2 hours to test, replace, reassemble the kiln and test again. But eventually I got it to work. I was going to stop there.

I have the other elements, so I might as well finish what I started. Which is what I am doing this morning, except upon taking apart the bottom half of the kiln I realized I was one clamp short because I had only replaced one with the newer screw down type of clamp and used a crimp on for the other.

Stupid, stupid, stupid. Now I can only replace three elements total and order another clamp before I can finish. Hopefully with three new elements it will go back to almost normal firing speeds and I'll just replace that last one after I get the last piece.

This kiln is temperamental though, between the top half and bottom half is a set of electrical plugs that allow the electricity to flow through the top elements. If they are not exactly lined up and pressed into place, I get zero electrical current in the top two elements. Not good for firing. And this is the problem I must deal with now. I have to take apart the kiln for the fourth time since I started this and see what is preventing one of the four prongs to be stubborn.

I have to have kilns, there is no getting around owning your own kilns if you live in the middle of the woods with no nearby art centers or other potters to rent kiln space from. There are other potters around, but we are all trying to be productive potters and if I have to haul my work over to someone else's studio every time I need to fire, I'll never get anything done and I'll be imposing upon their system of firing schedules.


...Crisis diverted. I opened the kiln to get ready to take it apart and noticed the top and bottom were misaligned by maybe a quarter of an inch. I shifted it over and the last prong popped into place. A ten minute fix instead of another thirty.


Monday, February 15, 2016

Broom Making Class

This last week I went up to Grand Marais, MN to take a class on broom corn broom making at North House Folk School. It was the fibers weekend, all the classes had something to do with fiber. I don't really travel much for pleasure and when I do it is usually in the company of a family member or I am going to see a family member. This time I went by myself and I didn't know anyone where I was headed, but do you know the great thing about fiber artists and crafters? They tend to be some of the nicest and most helpful people you can possibly get to know.

I spent my nights at the Art House B and B just a block from North House with three fiber enthusiasts and one tag-a-long husband who happens to make cedar strip canoes. I got to know one of the other guests pretty well since she was also a student, except she was taking a spinning series. The other fiber guests were a husband and wife who were teaching spinning and knitting, respectively. Each morning we gathered for breakfast and conversation and each evening everyone pulled out their knitting projects and gathered for conversation, except me. I went to converse, but I don't knit and I didn't bring any other fiber projects to work on while we talked. I have a hard time following conversation and crocheting at the same time.

My class was two days long and we made a whisk broom and a kitchen broom. I am very proud of both, although I had a much easier time making the whisk broom. My kitchen broom fell apart three times before I asked Dennis, the instructor, for help. I'm stubborn, if I want to try to produce brooms and sell them I need to be capable of making them on my own. I wanted to see if I could do it on my own, fix my own mistakes. Of course, I had never made a broom before so I didn't really know what I was doing wrong and asking for help was probably the smarter option.

I really enjoyed the finishing process, sewing the bristles into place and weaving the handles. I've always been more detail oriented and the fine work appeals to me. Plus I like sewing and weaving baskets was always fun when I had the opportunity to do so and these two steps were very reminiscent of those processes.

I ended up bringing home the scraps from my brooms and I have enough fiber left to make two more whisk brooms, or a whisk and a small broom. My mom is already hinting that she would like a pair of brooms. I guess I'll have to get on that.

I want to grow my own broom corn, which as I found out is not actually related to corn, it is a member of the sorghum family. Then I can harvest handles from my property... Um, eventually harvest handles from my property since I still live with my parents and I will currently have to harvest from their property.

I really do hope to become more comfortable and confident in my broom making. Even if I only sell one or two a year, it is just one more thing that I can do when I need something new to take my mind off frustrations in other areas of my craft interests. Plus I always feel the need to learn new things. Maybe next time I go to North House I'll learn to build a boat or make my own long bow. Just because I want to learn something new again and those sound interesting. But until that time I have other things to keep me busy.


When I got home from my trip I felt the need to do some spinning and turned some spun wool into yarn and I now have two small skeins of blue yarn that I will have to turn into something for myself. I may have to learn to love knitting. Or I can keep spinning yarn and let someone else handle the knitting. I think spinning is more fun anyway.

Monday, February 8, 2016

My Morning Ritual

I say I'm not a writer. That isn't to say I never write, but that up until now I haven't written anything I wanted others to read. I do write, every day.

Each morning when I get up I make breakfast, check emails and Facebook while I eat, and then I curl up on my bed with a warm, cozy, blanket that I've had for years and I write. With a pen and a journal. These are my personal thoughts, revelations, musings, memories, ideas. Whatever pops into my head during the half hour to an hour I spend writing in my journal goes onto the page. This is actually an exercise suggested in the book The Artist's Way by Julia Cameron called 'Morning Pages.'

Every morning you write three pages by hand, no typing allowed, to empty your thoughts, negative ones too into a personal journal. No one else is allowed to read these pages. You aren't even supposed to go back and read previous entries. In fact I'm a little afraid of what has come out on the page when I'm writing without thinking. It is also a way to get you, as a writer, to write. Every. Single. Day. Even if you have been stuck in a funk and feel you haven't written anything worthwhile you still have to write your Morning Pages. Even if you just write over and over again This is stupid, this is stupid, this is stupid. Eventually you'll get tired of writing "this is stupid" and start writing something else.

I have been writing consistently, every morning for a little over a year now. For Christmas in 2014 my brother and sister-in-law gave me The Artist's Way: Every Day, a companion book to The Artist's Way. I have both now, but never made it all the way through The Artist's Way, it felt too much like a textbook. Every Day gives one paragraph to reflect on or one idea to try to implement for each day of the year. So I write and I read that. Sometimes the reading really hits a chord, sometimes a nerve, but at least it gets me to stop and consider.

Writing at three pages a day, every day, I fill one of my journals in about two months. In fact, I just finished my current journal and started a new one this morning. I keep several extra journals on hand so I don't have to rush out a find a new one that I like. I'm very particular when it comes to journals. It has to be spiral bound, I've had the binding break on a journal before and now the pages fall out, it's very annoying, it must have lined pages, and it can't be huge. I like the ones that are about the size of a hardcover novel (about 6 inches by 8 inches). A stretchy band to hold it shut is also a plus.


So I write, I write every day, but I won't share those writings with you. My journal writing helps me to work out problems, maybe just air out some negative thoughts, or to ream out an individual that seriously pissed me off, but I couldn't come up with a comeback quick enough to say it to their face. I dream in my journals, sometimes cry in them. They don't always make sense, but they let me face my problems and maybe I'll be able to find some solutions eventually.